


What is the Correct Side of Cement Board?
Many installers assume cement board sides are interchangeable without understanding surface differences that affect performance and adhesion. Proper orientation ensures optimal bonding, moisture resistance, and long-term installation success while preventing common application failures.
Cement board typically has a smooth side and a rough textured side, with the smooth side facing outward for tile adhesion and the rough side against the substrate for better mechanical bonding to framing members and improved air circulation.
Through decades of cement board manufacturing and working with installation problems, I learned that proper orientation prevents adhesion failures and moisture issues while optimizing the performance characteristics that make cement board effective for wet area applications.
What Should Go Under Cement Board?
Understanding substrate requirements helps ensure proper cement board installation and long-term performance. The materials and preparation beneath cement board significantly affect installation success, moisture management, and structural integrity throughout the system's lifespan.
Cement board requires appropriate substrates including properly spaced framing, moisture barriers when needed, flat surfaces, and adequate support spacing, with specific requirements varying by application including floors, walls, and wet areas that demand different preparation approaches.
Comprehensive Substrate Analysis and Preparation Requirements
Cement board substrate requirements vary significantly by application and environmental conditions, requiring systematic preparation to ensure successful installation and long-term performance. During my experience working with installation failures and performance issues, I learned that proper substrate preparation prevents most common problems while optimizing cement board performance characteristics.
Framing requirements for cement board installation include proper spacing, adequate support, and structural integrity that provides stable mounting surfaces. Standard framing spacing of 16 inches on center works for most applications while 12-inch spacing may be required for heavy tile installations or high-stress applications requiring enhanced support.
Moisture barriers become critical in wet areas including shower surrounds, bathroom floors, and exterior applications where moisture infiltration can compromise installation integrity. Vapor barriers, waterproof membranes, or moisture-resistant coatings protect substrate materials while preventing moisture accumulation behind cement board installations.
Surface preparation ensures flat, clean, and structurally sound mounting surfaces that provide optimal cement board contact and fastening effectiveness. Surface irregularities exceeding 1/4 inch in 10 feet require correction through shimming, grinding, or surface preparation to prevent stress concentrations and installation problems.
Structural considerations include load-bearing capacity, deflection limits, and vibration resistance that affect cement board performance under service loads. Excessive substrate deflection can cause cement board cracking, joint failure, and tile installation problems requiring structural reinforcement or design modifications.
Floor applications require specific substrate preparations including subfloor flatness, moisture control, and deflection resistance that support ceramic tile installations. Plywood or OSB subfloors must meet deflection limits while concrete substrates require proper curing, levelness, and moisture content before cement board installation.
Wall applications involve different substrate requirements including stud spacing, moisture barriers, and surface preparation that accommodate vertical installation stresses. Wall installations typically require less structural support than floor applications while demanding attention to moisture management and fastening adequacy.
Wet area preparations require waterproof membranes, proper drainage, and moisture management systems that prevent water infiltration behind cement board installations. Shower installations demand comprehensive waterproofing including membrane application, joint sealing, and penetration detailing for long-term performance.
Adhesive compatibility ensures proper bonding between substrates and cement board while preventing chemical incompatibility that can compromise installation integrity. Some substrates may require primers, surface treatments, or specific adhesive formulations for optimal bonding performance.
Thermal considerations address expansion and contraction stresses from temperature variations that affect cement board installations. Proper expansion joints, flexible connections, and thermal break details prevent stress-related failures in applications with significant temperature variations.
Ventilation requirements in some applications help manage moisture accumulation and prevent condensation problems that can affect substrate integrity. Proper ventilation design maintains appropriate moisture levels while preventing mold growth and material deterioration.
| Substrate Type | Preparation Requirements | Moisture Considerations | Support Spacing |
|---|---|---|---|
| Wood framing | Level, properly spaced | Vapor barrier in wet areas | 16" OC standard, 12" OC heavy loads |
| Concrete | Clean, level, properly cured | Moisture testing required | Continuous support |
| Existing tile | Clean, sound, level | Assess waterproofing integrity | Depends on substrate condition |
| Plywood subfloor | 1/4" in 10' flatness | Moisture barrier recommended | Adequate joist spacing |
| Steel framing | Proper spacing, level | Condensation prevention | 16" OC standard |
| Masonry | Clean, level, sound | Moisture barrier critical | Continuous or spot support |
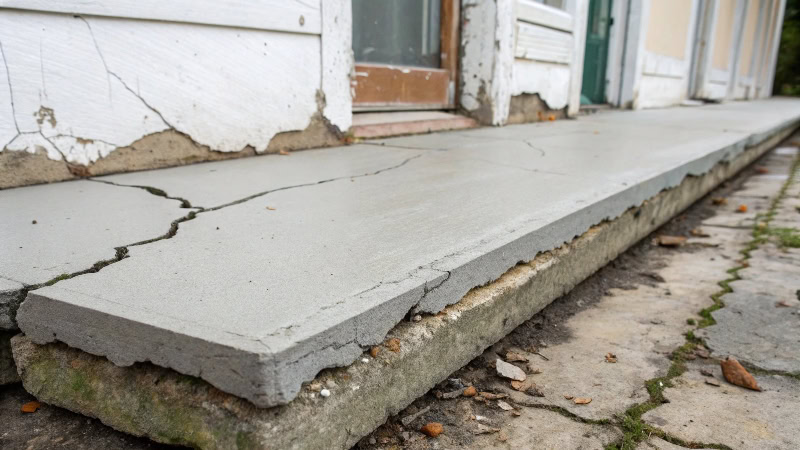
What Causes Cement Board to Crack?
Understanding cracking causes helps prevent installation failures and ensures long-term cement board performance. Cement board cracking typically results from installation errors, structural issues, or environmental factors rather than material defects, making proper diagnosis essential for prevention.
Cement board cracking commonly results from inadequate substrate support, improper fastening, missing expansion joints, structural movement, moisture exposure, or installation stress concentration points that exceed the material's tensile strength and flexibility limitations.
Comprehensive Crack Analysis and Prevention Strategies
Cement board cracking involves multiple potential causes that require systematic analysis to identify root causes and implement effective prevention measures. During my experience investigating installation failures and performance problems, I learned that most cracking results from preventable installation or design errors rather than material deficiencies.
Structural movement represents the primary cause of cement board cracking when substrate deflection, building settlement, or thermal expansion exceeds material flexibility limits. Excessive substrate deflection from inadequate framing or overloading causes stress concentrations that crack cement board along weak points or fastener lines.
Fastening problems create stress concentration points through over-driven screws, inadequate fastener spacing, or improper fastener selection that compromises installation integrity. Over-driven fasteners crush cement board surfaces while under-driven fasteners allow movement that stresses installations during service loading.
Expansion joint omission causes cracking when thermal expansion or moisture movement cannot be accommodated through installation flexibility. Large installations require expansion joints at specified intervals while transitions between different materials need flexible connections to prevent stress accumulation.
Substrate preparation deficiencies including surface irregularities, inadequate support, or contamination create installation problems that manifest as cracking after installation completion. Uneven substrates create high-stress areas while inadequate cleaning prevents proper adhesive bonding that transfers loads effectively.
Environmental factors including freeze-thaw cycles, moisture infiltration, and extreme temperature variations stress cement board installations beyond design limits. Moisture penetration can cause substrate deterioration while thermal cycling stresses installations through repeated expansion and contraction.
Installation technique errors including improper cutting, handling damage, or installation sequence problems weaken cement board installations and create crack-prone conditions. Sharp tools, proper cutting techniques, and careful handling prevent damage that compromises installation integrity.
Load concentration from heavy fixtures, impacts, or concentrated loads can exceed cement board capacity and cause localized cracking. Proper load distribution through backing supports or reinforcement prevents concentrated loading that damages installations.
Quality control deficiencies during installation including inadequate inspection, material defects, or workmanship problems contribute to cracking problems. Regular inspection during installation identifies problems before they cause failures while proper material handling prevents damage.
Age-related factors including material degradation, fastener corrosion, or system wear can contribute to cracking in older installations. Understanding aging effects helps plan maintenance and replacement programs while extending installation service life.
Prevention strategies include proper design, quality installation, adequate support, and regular maintenance that address cracking causes systematically. Comprehensive approach to crack prevention ensures long-term installation success while minimizing maintenance requirements.
| Crack Cause | Prevention Strategy | Detection Method | Repair Approach |
|---|---|---|---|
| Structural movement | Adequate support, expansion joints | Visual inspection, measurement | Structural reinforcement, joint installation |
| Fastening problems | Proper technique, spacing | Fastener inspection | Re-fastening, reinforcement |
| Missing expansion joints | Design review, joint installation | Thermal stress analysis | Expansion joint retrofit |
| Substrate problems | Proper preparation | Surface inspection | Substrate correction |
| Environmental stress | Protection measures | Performance monitoring | Environmental modification |
| Installation errors | Quality control | Process inspection | Installation correction |
| Load concentration | Load distribution | Load analysis | Reinforcement installation |
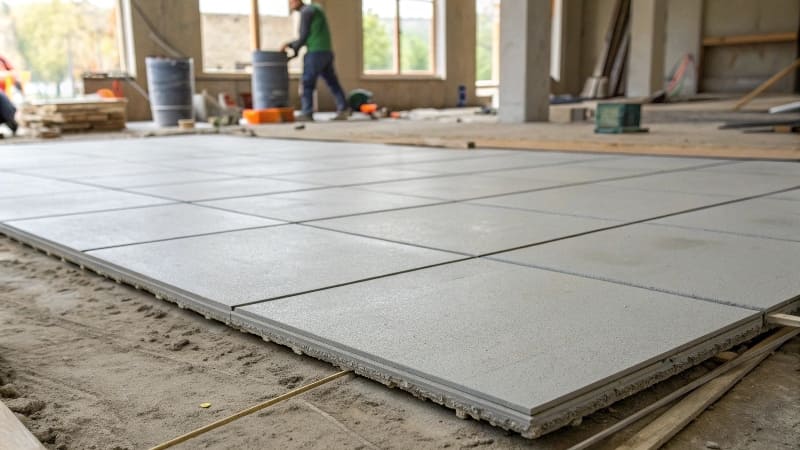
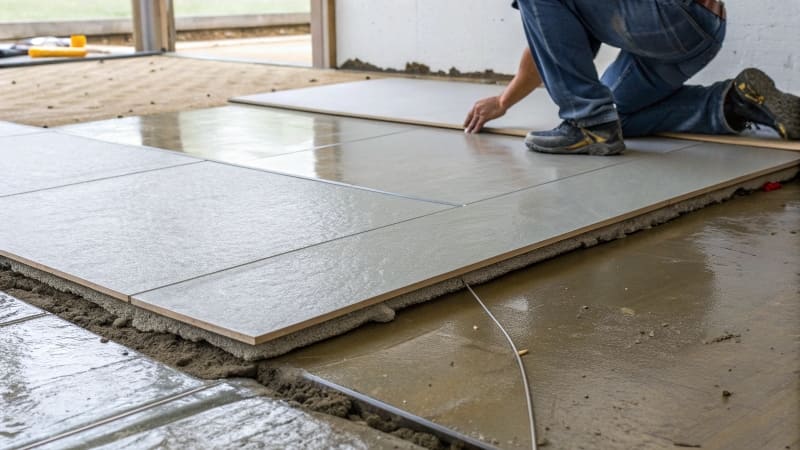
How Do You Properly Install Cement Board?
Understanding proper installation procedures ensures successful cement board performance and prevents common installation failures. Systematic installation approach addresses substrate preparation, fastening techniques, joint treatment, and quality control requirements for optimal results.
Proper cement board installation requires systematic substrate preparation, correct fastening techniques, appropriate spacing and support, proper joint treatment, moisture management, and quality control measures that ensure long-term performance and prevent common installation problems.
Comprehensive Installation Analysis and Quality Assurance Methods
Cement board installation requires systematic approach addressing preparation, installation, and finishing phases to ensure optimal performance and prevent common problems. During my experience working with installation specifications and troubleshooting performance issues, I learned that following proper procedures prevents most installation failures while optimizing material performance characteristics.
Preparation phase includes substrate inspection, surface preparation, material acclimation, and tool preparation that establish foundation for successful installation. Substrate must meet flatness, cleanliness, and structural requirements while materials should acclimate to installation environment preventing dimensional changes during installation.
Layout planning optimizes material usage while minimizing cuts and waste through efficient panel arrangement. Proper layout considers structural support locations, plumbing and electrical penetrations, and joint placement that ensures adequate support while minimizing cut pieces that may compromise installation integrity.
Cutting techniques using appropriate tools and methods prevent damage while ensuring clean, straight cuts that fit properly during installation. Sharp carbide-tipped blades, proper cutting technique, and dust control measures ensure quality cuts while protecting installer health and maintaining clean work environments.
Fastening procedures include proper fastener selection, spacing, and installation techniques that provide adequate holding power without damaging cement board surfaces. Fastener heads should be flush with surface while avoiding over-driving that crushes material or under-driving that allows movement.
Joint treatment involves proper spacing, backing, and sealing techniques that accommodate movement while preventing moisture infiltration. Joints require appropriate backing materials and sealants that maintain flexibility while providing weather resistance and structural continuity.
Penetration details around plumbing fixtures, electrical outlets, and other building components require careful cutting and sealing to maintain moisture resistance and structural integrity. Proper detailing prevents water infiltration while maintaining system performance around complex geometries.
Quality control during installation includes regular inspection, measurement verification, and problem identification that ensures specification compliance and prevents installation defects. Systematic quality control identifies problems before they compromise installation integrity while ensuring consistent installation quality.
Tool requirements include appropriate fasteners, cutting tools, measuring equipment, and safety gear that enable efficient, safe installation while producing quality results. Proper tool selection and maintenance ensure consistent installation quality while protecting installer safety and health.
Safety procedures protect installers from dust exposure, cutting hazards, and other installation risks through appropriate personal protective equipment and work practices. Dust control, eye protection, and proper tool handling prevent injuries while maintaining healthy work environments.
Finishing preparation includes surface cleaning, joint inspection, and preparation for subsequent finishes that optimize performance of complete wall or floor systems. Proper finishing preparation ensures optimal adhesion and performance of tile, paint, or other finishes applied over cement board installations.
| Installation Phase | Key Requirements | Quality Control Points | Common Problems |
|---|---|---|---|
| Preparation | Substrate inspection, material acclimation | Surface flatness, cleanliness | Inadequate preparation, contamination |
| Layout | Efficient panel arrangement | Joint placement, support alignment | Poor planning, excessive cuts |
| Cutting | Proper tools, clean cuts | Cut quality, dimensional accuracy | Rough cuts, incorrect dimensions |
| Fastening | Correct spacing, flush installation | Fastener depth, spacing verification | Over/under-driving, inadequate spacing |
| Joint treatment | Proper backing, sealant application | Joint consistency, moisture seal | Inadequate backing, poor sealing |
| Quality control | Regular inspection, specification compliance | Installation verification | Missed defects, specification deviations |
| Finishing preparation | Surface cleaning, final inspection | Surface condition, system readiness | Inadequate preparation, contamination |
Conclusion
Cement board installation success requires understanding proper orientation with smooth side out, adequate substrate preparation including appropriate framing and moisture barriers, preventing cracking through proper support and expansion joints, and following systematic installation procedures with quality control measures.
